Kami Staff: Difference between revisions
(Created page with "'''Type: Namekian Quests - Dragon Island''' '''Location: Namek''' '''Requirements: 270 lvl''' {| class="wikitable" style="text-align:center; width:70%;" ! Icon !! Item Name !! Amount |- | 40px || Senzu Bean || 500 |- | 40px || Senzu Stalk || 1000 |- | 40px || Senzu Leaf || 1500 |- | 40px || Ultra Namekian Robe || 1 |- | 40px || Heavenly Powder || 5...") |
No edit summary |
||
| (8 intermediate revisions by the same user not shown) | |||
| Line 1: | Line 1: | ||
__TOC__ | |||
'''Type: Namekian Quests - Dragon Island''' | '''Type: Namekian Quests - Dragon Island''' | ||
| Line 5: | Line 7: | ||
'''Requirements: 270 lvl''' | '''Requirements: 270 lvl''' | ||
{| class="wikitable" style="text-align:center; width: | {| class="wikitable" style="text-align:center; width:50%;" | ||
! Icon !! Item Name !! Amount | ! Icon !! Item Name !! Amount | ||
|- | |- | ||
| [[File: | | [[File:Senzu_bean.png|40px]] || Senzu Bean || 500 | ||
|- | |- | ||
| [[File: | | [[File:Senzu_stalk.png|40px]] || Senzu Stalk || 1000 | ||
|- | |- | ||
| [[File: | | [[File:Senzu_leaf.png|40px]] || Senzu Leaf || 1500 | ||
|- | |- | ||
| [[File: | | [[File:ultra_namekian_robe.png|40px]] || Ultra Namekian Robe || 1 | ||
|- | |- | ||
| [[File: | | [[File:Heavenly_powder.png|40px]] || Heavenly Powder || 5 | ||
|- | |- | ||
| [[File: | | [[File:Golden_Crystal_Ball.png|40px]] || Golden Crystal Ball || 20 | ||
|- | |- | ||
| [[File: | | [[File:piece_of_namekian_cloth.png|40px]] || Piece of Namekian Cloth || 100 | ||
|- | |- | ||
| [[File: | | [[File:Dynamite.png|40px]] || [https://wiki.dbwots.pl/index.php/CraftingRecipes#Utility Dynamite] || 1 | ||
|- | |- | ||
| [[File: | | [[File:Purple_key.png|40px]] || Purple Key || 1 | ||
|} | |} | ||
'''Reward: | '''Reward: 3kk exp, 2mln zenni, [[File:Kami_Staff.png|30px]] Kami Staff, [[File:Blessing_Orb.png|30px]] 3x Blessing orb (lvl 1)''' | ||
== Quest Spoiler == | == Quest Spoiler == | ||
To | |||
'''Starting Point:''' | |||
The mission begins with '''Mr. Popo.''' | |||
[[File:Mr_Popo.png|250px|thumb|right|Mr Popo]] | |||
[[File:Kami.png|250px|thumb|right|Kami]] | |||
<div style="display:flex; gap:10px; justify-content:left; align-items:flex-start;"> | |||
<div style="width:400px; text-align:center;"> | |||
[[File:Mr_Popo_Location.png|400x400px|center|frameless]] | |||
<div style="font-size:90%; margin-top:4px;"></div> | |||
</div> | |||
</div> | |||
He explains that Kami's Staff is an ancient artifact capable of concentrating the user's ki and materializing it into an impenetrable barrier. | |||
He sends us to '''Kami''', who is located below Mr. Popo. | |||
Kami tells us that we must first prove ourselves worthy before being considered as his successor. | |||
=== Step 1: Investigation Begins === | |||
When ready, we head to '''Neris''', located in Porunga Town. | |||
[[File:Neris.png|250px|thumb|right|Neris]] | |||
<div style="display:flex; gap:10px; justify-content:left; align-items:flex-start;"> | |||
<div style="width:400px; text-align:center;"> | |||
[[File:Neris Location.png|400x400px|center|frameless]] | |||
<div style="font-size:90%; margin-top:4px;"></div> | |||
</div> | |||
</div> | |||
Our first task is to investigate the Mystical Namekians occupying Dragon Hills. | |||
Objective: | |||
Defeat '''1000 Mystical Namekians.''' | |||
Report back to '''Neris''' once done. | |||
=== Step 2: The Ancient Ornament === | |||
He tells us about the Ancient Ornament. To learn more, we must visit the '''Library''', located in the lower levels of '''Xylo Tower'''. | |||
[[File:Library.png|300x200px]] | |||
[[File:Library_book.png|350x350px]] | |||
After reading the relevant book, we head to '''Fidel'''. | |||
[[File:Fidel.png|250x250px|thumb|right|Fidel]] | |||
[[File:Sani.png|250px|thumb|right|Sani]] | |||
<div style="display:flex; gap:10px; justify-content:left; align-items:flex-start;"> | |||
<div style="width:300px; text-align:center;"> | |||
[[File:Fidel_and_Sani_Map.png|300x200px|left|thumb||]] | |||
<div style="font-size:90%; margin-top:4px;"> | |||
<span style="color:deepskyblue;">Azure</span> - Fidel | |||
<span style="color:gold;">Yellow</span> - Sani | |||
</div> | |||
</div> | |||
</div> | |||
He mentions '''Sani''', who had recently searched for the ornament and recommends speaking with him. | |||
=== Step 3: A Deal with Sani === | |||
'''Sani''' offers some information, but only in exchange for resources: | |||
Bring him: | |||
'''500x Senzu Bean''' | |||
'''1000x Senzu Stalk''' | |||
'''1500x Senzu Leaf''' | |||
In return, he reveals that the passage is near the southern part of Outcast Village, specifically along the eastern shore. Be cautious — something there scared even Sani away. | |||
'''⚠️ WARNING:''' | |||
Upon descending, you'll be swarmed by monsters. Proceed with caution. | |||
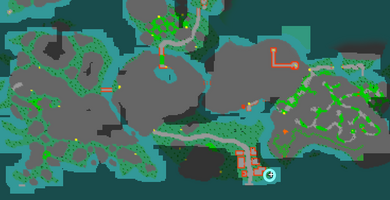
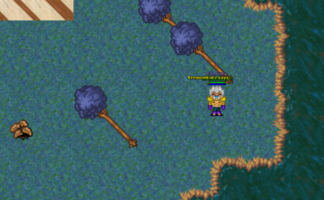
=== Step 4: The Hidden Cavern === | |||
After defeating the monsters, move through the passage and begin exploring the cave. | |||
<div style="display:flex; gap:10px; justify-content:left; align-items:flex-start;"> | |||
<div style="width:300px; text-align:center;"> | |||
[[File:Shovel_Map_Location.png|x200px|frameless]] | |||
<div style="font-size:90%; margin-top:4px;"></div> | |||
</div> | |||
<div style="width:300px; text-align:center;"> | |||
[[File:Shovel_Location.png|x200px|frameless]] | |||
<div style="font-size:90%; margin-top:4px;"></div> | |||
</div> | |||
</div> | |||
Retrieve the Ancient Ornament and return to Neris. | |||
[[File:Ornament.png|500x500px|]] | |||
He is shocked that you managed to find it. He mentions that the next phase of your journey will be revealed at a meeting scheduled during the day. | |||
Return to Neris between '''19:00 and 21:00.''' | |||
(You can check the time using public clocks or by purchasing a watch from the Wandering Merchant on Vegeta.) | |||
=== Step 5: A Ritual for the Dragon Balls === | |||
During the meeting, we learn the Namekians wish to strengthen their Dragon Balls, but this requires an incantation only known by the Elder Namekians of ancient times. We must resurrect one from beyond. | |||
To do that, we need to find the Key to the Crypt. | |||
Head to '''Kami''', who might know more. | |||
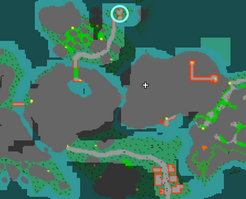
Kami recounts a tale from his father, who said Katas once protected the crypt during an apocalypse. He sends us to examine a grave located in the northern part of Dragon Island. | |||
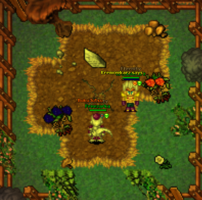
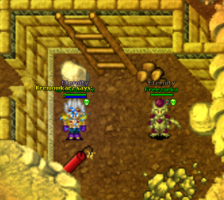
Dig in front of the grave. You’ll need dynamite to destroy the wall. | |||
<div style="display:flex; gap:5px; justify-content:left; align-items:flex-start;"> | |||
<div style="width:300px; text-align:center;"> | |||
[[File:Grave_location.png|x199px|frameless]] | |||
<div style="font-size:90%; margin-top:4px;"></div> | |||
</div> | |||
<div style="width:300px; text-align:left;"> | |||
[[File:Grave_dig.png|x200px|frameless]] | |||
<div style="font-size:90%; margin-top:4px;"></div> | |||
</div> | |||
<div style="height:200px; width:auto; text-align:left;"> | |||
[[File:Dynamite_Wall_Kami.png|x200px|frameless]] | |||
<div style="font-size:90%; margin-top:4px;"></div> | |||
</div> | |||
</div> | |||
=== Step 6: The Crypt and Incantation === | |||
Once you retrieve the key (which respawns after every server reset), return to '''Neris'''. | |||
[[File:Purple_Key_Place.png|300x200px|]] | |||
To pass through the flames guarding the key, defeat all monsters in the chamber. | |||
[[File:Ethernal_flame.png|500x500px|]] | |||
Before heading into the crypt, '''Neris''' asks you to gather the following items for the ritual: | |||
Bring him: | |||
'''1x Ultra Namekian Robe''' | |||
'''5x Heavenly Powders''' | |||
'''20x Golden Crystal Balls''' | |||
'''100x Pieces of Namekian Cloth''' | |||
Return the materials to Neris. He will give you a [[File:Sacred_book.png|30px]] Sacred book to write down the incantation spoken by the Elder. | |||
Now you're ready to enter the crypt and summon the Elder Namek. | |||
<div style="width:300px; text-align:left;"> | |||
[[File:Ultra_namek_location.png|300x200px|left|thumb|]] | |||
<div style="font-size:90%; margin-top:4px;"></div> | |||
</div> | |||
<div style="display:flex; gap:10px; justify-content:left; align-items:flex-start;"> | |||
<div style="width:300px; text-align:center;"> | |||
[[File:Boss_passage1.png|300x200px|left|thumb||]] | |||
<div style="font-size:90%; margin-top:4px;"> | |||
<span style="color:deepskyblue;">Azure</span> - Path to deeper parts of cave | |||
<span style="color:gold;">Yellow</span> - Exit | |||
</div> | |||
</div> | |||
<div style="width:300px; text-align:left;"> | |||
[[File:Boss_passage_2.png|300x200px|left|thumb|]] | |||
<div style="font-size:90%; margin-top:4px;"></div> | |||
</div> | |||
</div> | |||
[[File:Kami_Staff_Crypt.png|none|left|thumb|Inside the Crypt]] | |||
=== Step 7: The Boss Fight === | |||
Inside the teleportation chamber, you will face waves of monsters — defeat them all to proceed to the boss. | |||
[[File:Last_mobs_line.png|none|left|thumb|]] | |||
Use the ornament on the grave and step away quickly to avoid getting trapped by the respawning mobs and flames. | |||
[[File:Kami_Staff_boss_respawn.png|none|left|thumb|Place to use ornament to spawn boss]] | |||
=== Boss Mechanics: Elder Namek === | |||
==== Phase 1: ==== | |||
Primarily uses melee attacks. | |||
Weak to '''ki-based damage'''. | |||
==== Phase 2 (Triggered at 50% HP): ==== | |||
Switches to ranged attacks. | |||
Begins releasing shockwaves that inflict '''Paralyze (5s)'''. Get hit twice and you're paralyzed – dodge those waves! | |||
Weak to '''physical damage''' in this phase. | |||
Summons mobs — do not cross flames during this part. | |||
During the fight, the Grand Elder Spirit will speak the incantation: | |||
✨ "Papitto pa pi sa de Porunga monocanco dali re de sun." | |||
Be sure to write this down in the [[File:Sacred_book.png|30px]] Sacred book. | |||
=== Step 8: Final Steps and Reward === | |||
After defeating the boss: | |||
Return the book to '''Neris'''. | |||
Go to '''Kami''' to receive your main reward. | |||
Latest revision as of 15:47, 19 April 2025
Type: Namekian Quests - Dragon Island
Location: Namek
Requirements: 270 lvl
| Icon | Item Name | Amount |
|---|---|---|
| Senzu Bean | 500 | |
| Senzu Stalk | 1000 | |
| Senzu Leaf | 1500 | |
| Ultra Namekian Robe | 1 | |
| Heavenly Powder | 5 | |
| Golden Crystal Ball | 20 | |
| Piece of Namekian Cloth | 100 | |
| Dynamite | 1 | |
| Purple Key | 1 |
Reward: 3kk exp, 2mln zenni, ![]() Kami Staff,
Kami Staff, ![]() 3x Blessing orb (lvl 1)
3x Blessing orb (lvl 1)
Quest Spoiler
Starting Point:
The mission begins with Mr. Popo.


He explains that Kami's Staff is an ancient artifact capable of concentrating the user's ki and materializing it into an impenetrable barrier.
He sends us to Kami, who is located below Mr. Popo.
Kami tells us that we must first prove ourselves worthy before being considered as his successor.
Step 1: Investigation Begins
When ready, we head to Neris, located in Porunga Town.


Our first task is to investigate the Mystical Namekians occupying Dragon Hills.
Objective: Defeat 1000 Mystical Namekians.
Report back to Neris once done.
Step 2: The Ancient Ornament
He tells us about the Ancient Ornament. To learn more, we must visit the Library, located in the lower levels of Xylo Tower.


After reading the relevant book, we head to Fidel.


Azure - Fidel
Yellow - Sani
He mentions Sani, who had recently searched for the ornament and recommends speaking with him.
Step 3: A Deal with Sani
Sani offers some information, but only in exchange for resources:
Bring him:
500x Senzu Bean
1000x Senzu Stalk
1500x Senzu Leaf
In return, he reveals that the passage is near the southern part of Outcast Village, specifically along the eastern shore. Be cautious — something there scared even Sani away.
⚠️ WARNING:
Upon descending, you'll be swarmed by monsters. Proceed with caution.
Step 4: The Hidden Cavern
After defeating the monsters, move through the passage and begin exploring the cave.


Retrieve the Ancient Ornament and return to Neris.

He is shocked that you managed to find it. He mentions that the next phase of your journey will be revealed at a meeting scheduled during the day.
Return to Neris between 19:00 and 21:00.
(You can check the time using public clocks or by purchasing a watch from the Wandering Merchant on Vegeta.)
Step 5: A Ritual for the Dragon Balls
During the meeting, we learn the Namekians wish to strengthen their Dragon Balls, but this requires an incantation only known by the Elder Namekians of ancient times. We must resurrect one from beyond.
To do that, we need to find the Key to the Crypt.
Head to Kami, who might know more.
Kami recounts a tale from his father, who said Katas once protected the crypt during an apocalypse. He sends us to examine a grave located in the northern part of Dragon Island.
Dig in front of the grave. You’ll need dynamite to destroy the wall.


Step 6: The Crypt and Incantation
Once you retrieve the key (which respawns after every server reset), return to Neris.

To pass through the flames guarding the key, defeat all monsters in the chamber.

Before heading into the crypt, Neris asks you to gather the following items for the ritual:
Bring him:
1x Ultra Namekian Robe
5x Heavenly Powders
20x Golden Crystal Balls
100x Pieces of Namekian Cloth
Return the materials to Neris. He will give you a ![]() Sacred book to write down the incantation spoken by the Elder.
Sacred book to write down the incantation spoken by the Elder.
Now you're ready to enter the crypt and summon the Elder Namek.


Azure - Path to deeper parts of cave
Yellow - Exit


Step 7: The Boss Fight
Inside the teleportation chamber, you will face waves of monsters — defeat them all to proceed to the boss.

Use the ornament on the grave and step away quickly to avoid getting trapped by the respawning mobs and flames.

Boss Mechanics: Elder Namek
Phase 1:
Primarily uses melee attacks.
Weak to ki-based damage.
Phase 2 (Triggered at 50% HP):
Switches to ranged attacks.
Begins releasing shockwaves that inflict Paralyze (5s). Get hit twice and you're paralyzed – dodge those waves!
Weak to physical damage in this phase.
Summons mobs — do not cross flames during this part.
During the fight, the Grand Elder Spirit will speak the incantation:
✨ "Papitto pa pi sa de Porunga monocanco dali re de sun."
Be sure to write this down in the ![]() Sacred book.
Sacred book.
Step 8: Final Steps and Reward
After defeating the boss:
Return the book to Neris.
Go to Kami to receive your main reward.